Posted on 1 Comment

The Hanging Gardens

This is one of my three final commissions for this year, meaning I have two more to go before this series is done and I can finally start lay-out for the “Airships and Tentacles” book.

These have been rather slow-coming – I’ve been chomping off bits of my work list, and well, between home repair, prepping for coming conventions, keeping food on the table (web/programming work), shipping, and *still* catching up on kickstarter stuff… it all feels like ‘nibbling’, though I haven’t slowed down or stopped in nearly a year.

Anyway, I painted this one at 18×12 inches on Oak panel… you can see a few details below, but certainly not all of them. As per usual… tiny, tiny brush strokes and figures about the size of a grain of rice…

I have it imaged at 600DPI, to ensure that these details show as well as the original in printed form, and those prints are now available HERE.

There are only 10 available, they are printed on canvas at the exact same size as the original painting. As an early buyer incentive, the first two to sell are available for only $190; They’ll go back up after those two have sold.

Posted on

New Wallpaper: The Ruins 1280×800

This piece is somewhat based on my collaborative work with Bethalynne Bajema … That 30 foot x 10 foot mural we have sitting in our garage awaiting a studio space to display it in.

The mountain city-scape in this picture is *heavily* influenced by her creations, as well as my desire to see them as functional parts of a mountain landscape.

The original is available here: [link]

35 signed, dated, Limited Edition Giclees ($90) are available here – but the first ten are available at $55 here: [link]

The-Ruins-1280x800 Steampunk Fantasy Art Desktop Wallpaper by Myke Amend
The-Ruins-1280x800 Desktop Wallpaper by Myke Amend
Posted on 3 Comments

Full Steam Ahead

This piece was done earlier this year in pencil on bristol board; It was my intention to color all of these after the World Steam Expo, but one thing led to another and – well, I finally have this once all colored up.

The 11×14 black and white giclees of the original pencil drawing are still available (here), and there are only a handful of those left, but now available are 30 of these colored ones (here) – same size, printed in pigment inks on same high quality fine art rag paper. An open edition 8×10 metallic is also available (here)

MACH Turtle steampunk Alice in wonderland Alice through the looking glass panting by Myke Amend
MACH Turtle by Myke Amend
MACH Turtle Detail - steampunk alice in wonderland painting by Myke Amend
MACH Turtle Detail
MACH Turtle Detail - Steampunk Alice through the looking glass painting by Myke Amend
MACH Turtle detail 2
Posted on

Colour from Space

Dead Sea Painting by Myke Amend

An experiment in color, recently completed as a commission for Mike Skoog, wherein he asked if I could do something small enough for his music room, and more colorful than my standard muted palettes.

I went the more impressionistic route with this one, and instead of starting with the colors as I wanted them, I started with the nearest primary colors in their place, and worked downward in saturation and sideways in hue, until I reached this point.

Details are painted so incredibly thin, that I practically painted them with the very corner of a single hair, dropping molecules of paint in a line for stitches and ropes and other details. In this, I am reminded that working smaller is actually harder, not easier, because I still feel compelled to add my standard amount of detail…but in a smaller space (which means eye-strain and neck cramps in spades, and a more time-consuming work).

All the same, sometimes I like working small just for the opportunity to test my patience and practice my hand.

That was the second to last of all the commissions that remained on my plate before Artprize… one more to go, then I am my own man until I sell another…

Signed and dated giclees of this are available for only $25 here for a limited time, or $30 through Etsy

Posted on

Big Framing Adventure

When it comes to the expense of framing, shipping, the gallery’s percentage cut, the risk of needing to have things shipped back afterward, and all those instances where art gets stolen or damaged somewhere along the way, galleries close unannounced, or maybe never even existed – well, gallery showings are the sort of anxiety that I often find myself trying to avoid. For this reason I tend to prefer conventions if possible, or shows that are actually within driving distance.

And in those instances, I still often find myself in this sort of panicked state over things: Logistics, packing, unpacking, hanging, being around people all come in to play – but the highest anxiety of all, tends to come with framing.

Since I make most of my sales online, and since frames add significantly to the online selling price, and to the shipping cost – I tend to send my large originals unframed, unless otherwise requested – which means that I never bother framing them at all – until that rare chance to show someplace worthwhile and drivable presents itself… as things with galleries go, which often starts with a “showtime is two weeks from now and we need these in a few days”.

Being an artist, I never have money laying around to frame one piece, let alone three or five. If I ever find myself with a handful of bills to call my own, the money typically goes toward re-stocking on shipping tubes, getting a new run of merch made, having a run of prints printed, buying new canvas, new paints, something entirely new to try my hand at, or bigger and better versions of things I have, for making a bigger and better piece I’ve dreamed of being able to make.

If you are an artist who has ever needed something custom-framed for a coming show, and find that the framing stores have closed – or just cannot afford to have frames done at a gallery, or even craft store – a table saw (or a hand saw and a miter box) are often a god-send.

I typically make some pretty nice frames – though not as wonderfully ornate as those made from the sort of moulding that one can only get through a framing store, they are made from real wood – most often some really good real wood, and are incredibly durable and made to last. They also have a bit of hand-made charm to them, and often are a bit of artwork in their own.

Sometimes I add polymer clay, brass fittings, brass chains and ornaments, decorative tacks, wood appliques, or designs I have cut with a scroll saw; Sometimes I accent them through pyrography, or intricate carved details – they sky is pretty much the limit when making one’s own frames…

Well, the sky, time, and money…

This is one of those instances where money and time factored in more than most. This frame was not made from the chunk of fire maple I am saving for something, or the strip of cherry I am saving for something else – it was made from used pine, which came from supports for a stage set – though I almost used an antique door or two to have harder wood in this mix without using my reserved pieces.

Step 0: (Materials and Preparation):

Materials: Wood, wood glue

Tools: Saw, miter box (can be made with wood and saw), table saw (optional), clamps or straps or a bit of ingenuity to hold pieces tight until the glue dries, sand paper.

Recommended: Something to make the wood something more than just flat and boxy – such as a router, Wood burner, rotary tool, scroll saw, bits to decorate the frames with such as brass cabinet knobs, bits of chain.. the sky is the limit. Really, it depends on how intricate and perfect you want them – you can make them anything from folksy and bare, to contemporary and smooth/plain, to fine works of wood-crafting, to works of art in their own.

Preparation: I cut the pine pieces long-way with the table saw to make sure I had enough pieces, and that they were equally broad and equally thick. For the main part of the frame, I made two pieces that were 8 feet long, 3 inches wide, and 1 inch thick. From a 2×4 stud, I also made 2 pieces that were 8 feet long, 1 inch wide, and half an inch thick. You can skip that step if you can get to a hardware store and buy wood in this size – I recommend a few strips of select pine (heartwood pine) – It acts like hardwood, feels like hardwood, even *counts* as a hardwood to some – and is only about $3 a strip at Home Depot – buy 2 1x2s, 1x3s, or 1x4s, and one 1×1 – and you won’t need to do any length-wise cutting. If you do not have a table saw, a handsaw and a miter box will do. If you do not have a miter box – make one (3 pieces of wood, plus wood glue (or nails) and something the measure a 45 degree angle with). A good string wood glue in necessary. Ratcheting straps (tow straps) or corner clamps, or maybe even bar clamps if they are big enough for what you are working on – will save you a lot of frustration. Without pressure, the wood glue will take forever to dry, and your bonds will not be as strong or as clean. Paint, or wood stain, will probably also come in handy.
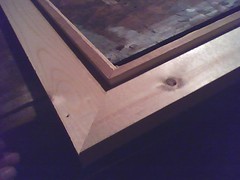
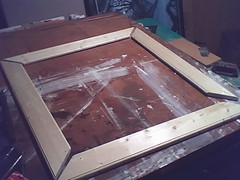
_Preview_.JPEG First step was to make a basic frame with an inside dimensions of 49×30 and outside dimension of 55 x 36. This construct is just flat wood and 45 degree angles – nothing fancy – all done with a table saw and an angle jig.
Frame in the worksA good amount of wood glue on the edges and some corner clamps made a boxy “finished” frame. Clamp tight, and let the glue dry at least 15 minutes. The tighter you clamp it, the better the glue will penetrate, the thinner it will fan out, and the faster it will dry.

Then I made another such piece one out of thinner wood strips (which I cut off a bigger piece with the table saw), this one with 1/4 of an inch less for the inner diameter.

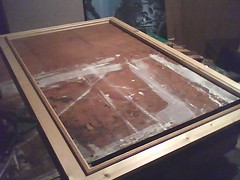
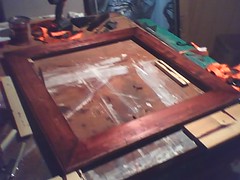
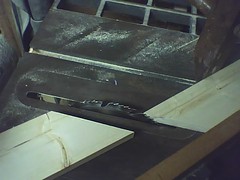
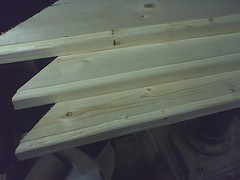
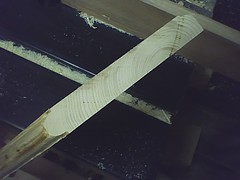
When the pieces for this “smaller” frame were done, I rounded their edges on the routing table, and then glued them together on the main frame – creating a lip big enough to hold in the painting but still covering as little of its edges as possible. (You can see what it looks like attached to the frame in the above image, and you can see a cross-section of the routed pieces in the image below)
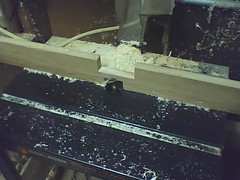
_Preview_.JPEG_Preview_.JPEG

Frame in the worksA wider view of the frame with the second “frame” glued to its top.
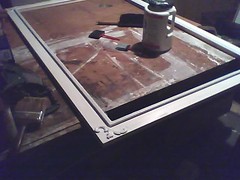
Gessoed FrameI added some wood appliques (available at Home Depot, Michael’s, Hobby Lobby) to dress up the corners some; I then took to covering the thing in a thin layer of gesso so the paint holds on better. Typically my finishing would mean I would stain, wipe, stain, wipe, stain, wipe, smooth, varnish, smooth, varnish, smooth, varnish… but such is a three day process (if I don’t miss a beat). I needed to get this frame done by morning- so…
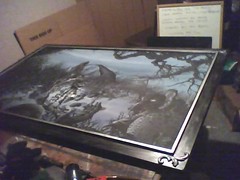
_Preview_.JPEGI added a metallic finish to it (silver spraypaint), then soaked it in watered-down black acrylic, then wiped up the black save for the crevices, then brushed over it in black, and wiped the black away from the part that borders the painting. It looks like it is hewn out of decades-neglected silver or maybe pewter.

If I could go back and do it again (which I may someday down the line) I’d faux finish it a deep red oak. I thought about doing this – but I’d like to see if I can get two hours rest in before we have to leave.

FinishedThis painting is just popped into the back. I typically cover the back with some really heavy craft paper – but I don’t have nearly enough on hand for that. The hanging wire is fastened into the painting itself on this piece, the the frame is more of a decorative surround, not a means to hang by. I may however move the hanging wire to the frame, just to be ‘normal’.

Below are some pics from another frame in progress. I routed both edges on one side (the inside edge), and rounded just one on the outside edge. The painting (a thin painting on hardboard) will rest within the router-made recess made in the inside edge). The outer edge has only one flat side so the assembled frame will sit flush against the wall.

I will probably stain and varnish this one – and will probably simulate the look of an age-old frame with multiple layers of stain, and leaving bits of extra stain in the crevices with each step.
_Preview_.JPEG_Preview_.JPEG_Preview_.JPEGStained

Posted on

Sorry Charlie

One of several possible layouts or poses for his sculpture
Sorry Charlie - fine art sculture by Myke Amend

He came to the surface world, wondering where all the food had gone, but there were no fish to be found on land.

There was however an abundance of two legged meat-things… they tasted somewhat like seals; Perhaps even enough to save his kindred, and maybe enough to last till next season.

All he knew, was that he had to return to tell the others, but maybe after just one more meal or two…

All pieces were sculpted, hand-painted, silver-leafed (cans of tuna), and hand-varnished by Myke Amend and come as a set. The wood barrels and scrapbooking paper aren’t included, but could be if you really want them.

Sorry Charlie - fine art sculture by Myke Amend
One of several layouts fo rthis sculpture

One of several possible layouts or poses for his sculpture; I envisioned it with Charlie on top of the crate looking up pitifully, with a few old cans of tuna laying about the scene (as above), but I really have a hard time choosing just one. There are more images, including closeups on the Etsy Page at ettadiem.etsy.com.

The set includes Charlie the sea monster, 3 tuna cans, “wooden” (polymer clay) crate, and crate lid:

“Charlie” is about 3.5 x 2 x 2 inches. His eyes are made out of brass, and all scales, shading, and countershading are hand-painted on.

The Polymer Clay crate is roughly 4.5 x 3.5 x 3.5 inches.

Tuna cans are tiny… really tiny.

This is a fine art sculpture, and is *not* a toy. It is *not* intended or recommended for anyone under the age of 18.

I put a lot more work into this than I expected to. My first thought was to make something quick I could sell for $40 or so, but then I decided to use brass for eyes, then to hand-brush and shade scales onto him, then to make the crate out of clay instead of weed, then silver leafing the tuna cans for a more realistic look… I’d sell it for $300 for all the work that went into it, and its uniqueness (only one of its kind), but right now it is up for $145 on Etsy.

We are putting a lot of time and resources into our Artprize bid… a $5,000 estimated expense, between 5 people who can barely scrape together a handful of change (i.e. artists, post-July,2008). So, if you want to make good of our situation, this sculpture is available online until we have the fundraiser/teaser for the event – in which case it will be on sale there.

Posted on

20 Free IPhone (or other smart phone) desktop wallpapers

I sat up tonight making this first wave of free skins for the iphone.. why? I don’t know… I don’t even have one. They do however seem to be popular, and hopefully even people without that specific phone can use these.

These images are free to use for your own personal non-commercial use on your own phone.

There is no rule that says you specifically *have* to use them on an iphone though, if you are able to use them for any other cell phone or smart phone, please feel free. You also have my permission to change them to bitmap, gif, png, or whatever format your phone takes.

Posted on

Some Day I Will Never Grow Up

SomeDay I Will Never Grow Up
SomeDay I Will Never Grow Up - Acrylic on Wood Panel Painting by Myke Amend (click for larger view)

The original was painted on a wood panel cabinet I hand-made for the purpose of doing this painting. I’ll be finishing up the cabinet when I return home.. I can’t tell you what I’ll be filling the cabinet with – but when the construct is done, I will have had a lot of fun making things to fill it with.

Though the cabinet is not done, the painting part of it is, and it was lovingly, carefully scanned for truest color and detail, and printed as a giclee for the best, most highly-detailed and most brilliant reproduction quality.

Someday I will Never Grow Up Detail 1
Detail 1
Some Day I will Never Grow Up Detail 2
Detail 2
Some Day I Will Never Grow Up Detail 3
Detail 3

These are printed 12×18 (the original size of the work) on Canvas (for the optimal standard framing size), in archival pigment inks on 200+ year archival quality heavyweight cotton canvas. Each is coated with a UV, moisture, and scratch-resistant coating for added longevity.

25 total will be printed. All giclees on Canvas are shipped stretched and mounted withing the US, or rolled everywhere else (but you can arrange to receive a stretche copy if you wish to work out additional shipping).

Each is hand-signed, hand-numbered, and dated by Myke Amend. Each also comes with a certificate of authenticity. Both the artwork and the certificate have matching serialized holograms affixed to them (front of certificate, back of canvas) for added assurance and to protect the value of your print.

The Giclees on Canvas are available here: 12×18 Giclee on Canvas

***Also Available***

1) a 16×20 OPEN edition SIGNED giclee on fine art rag paper. No guarantee how long they’ll be available, but they are not as limited as the giclees on canvas.

2) a 9×12 metallic print of this same image, also open edition.

Posted on 2 Comments

Mach Turtle!

Mach Turtle Detail 1
Mach Turtle Detail 2
Mach Turtle Detail 3
Mach Turtle Detail 4
Mach Turtle
Mach Turtle

Limited Edition of only 20, printed in archival inks on fine art rag paper.

Printed on fine art rag paper at the exact size of the original pencil drawing – hand-signed, numbered and dated by Myke Amend.

Printed at 11×14 inches on an 18×15 sheet of 200-year archival fine art rag paper in archival pigment inks, each giclee is a long-lasting work of art in its own.

Only 20 prints of the original pencil drawing will be made, ever.

Alice rides a Mock Turtle at high speed along a peppermint lollipop shoreline, followed by the Mad Hatter in his own special-crafted craft.

These images are not made to be exact to the original story, or any movie, but rather to capture and portray the wonder that mythical and magical lands may hold within a child’s imagination.

The need to do my own version of turtle from this story was inspired by stories of turtles being burned at sea. It is sad to think that there are beautiful beaches children may never see, once-beautiful coastal towns no longer what they were, forests burning, parks being bulldozed to make way for sprawl… a beautiful Earth that may someday be nothing more than a story for our children and our children’s children.

I hope that maybe, if we can preserve the wonder and fascination, perhaps future generations will be inspired to dream for what was. And perhaps someday, the most fascinating new thing that a future generation could strive for and dream of, will not come from a Wal-Mart or the Apple Store… but in the restoration of all the beauty, wonder, and freedom we threw away.

Posted on

Mankind Has No Time (Desktop Wallpaper)

Mankind Has No Time 1280x960 Desktop Wallpaper

This image was the cover for the upcoming September/October issue of Gatehouse Gazette, an excellent dieselpunk, pulp, horror, sci fi, steampunk mag if you aren’t already reading it. It was originally done for the magazine in pen and ink, as per their black and white specifications, but I decided to complete the piece with color after the publication date.

This is the finished result… very vintage pulp in its look and feel.

What I was going for was a very retro sort of Neon Genesis Evangelion sort of concept…of course what it translated to, especially with the 1940’s technology looks very “War of the Worlds”, both of which made it an enjoyable and fun piece to do.